Once you have a sashiko pattern as a printed PDF, the next step is getting those lines onto your fabric. Unlike painting or quilting, sashiko is stitched along precise geometric grids — so accuracy at the transfer stage saves you a lot of frustration later.
These four methods cover most situations you’ll encounter, from lightweight cotton to dark indigo denim.
Method 1 — Water-soluble transfer pen + a light source
Best for: Light-colored fabrics (natural cotton, white, cream, pale gray).
This is the most accessible method and works beautifully on fabric that lets light pass through.
What you need:
- A window with good natural light, or a dedicated lightbox / light pad
- Your printed pattern (on regular printer paper)
- A water-soluble marking pen (blue wash-away), or a heat-erasable pen (Frixion-style) for light, undyed fabric only
- Low-tack tape
Steps:
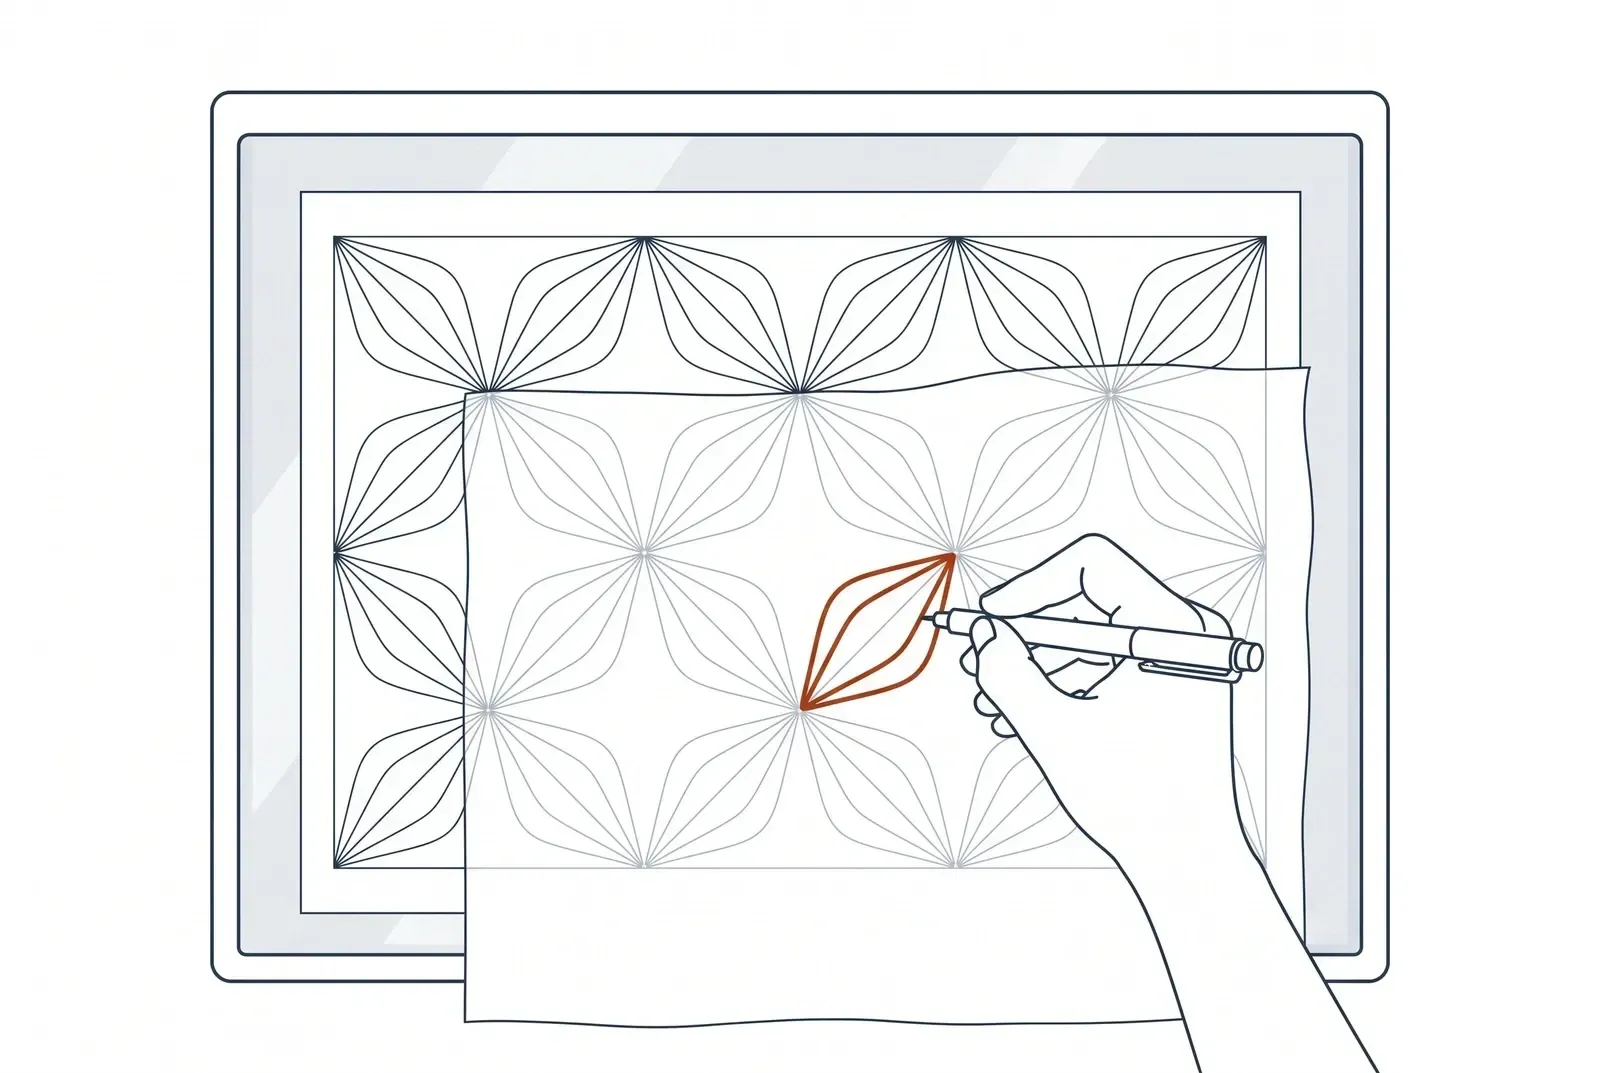
- Tape your printed pattern to the window or light pad.
- Place your fabric on top, centering it over the design. Tape the fabric lightly at the corners to keep it from shifting.
- The lines of the pattern will show through the fabric as a shadow. Trace all the lines with your marking pen, using a light, consistent hand — you want a fine line, not a thick blob.
- Remove the fabric and let the ink dry for a minute before you touch the surface.
- Stitch as normal, then remove the markings: cold water washes out water-soluble ink; a warm iron erases heat-erasable ink.
A note on heat-erasable pens. Always test on a scrap first. Heat-erasable marks can reappear if the fabric later gets very cold, and on solid-dyed or indigo cloth the heat can bleach a faint, near-permanent ghost line into the dye — so keep them for light, undyed fabric, and use dressmaker’s carbon (Method 2) on anything dark or indigo.
Tip: For dense geometric patterns with lots of crossing lines (like asanoha or shippō), work in sections rather than trying to trace the whole design at once. It reduces the chance of smudging a partially-traced area.
Pros: The most accessible method — no special supplies beyond a pen and a window, and the cheapest way to start.
Cons: Only works on light, fairly translucent fabric, and freehand tracing takes a steady hand on dense grids.
Method 2 — Dressmaker’s carbon / tracing paper
Best for: Dark or medium-weight fabrics — indigo, navy, charcoal — where light won’t pass through.
Dressmaker’s carbon (also called sewing transfer paper) is a waxy sheet that transfers ink from pressure. It is not the same as graphite carbon paper; look for the kind sold specifically for fabric in quilting and dressmaking shops.
What you need:
- Dressmaker’s carbon paper in a color that will show on your fabric (white or yellow for dark cloth)
- Your printed pattern
- A stylus, empty ballpoint pen, or a smooth-tipped tracing tool (a blunt knitting needle works too)
- A hard, smooth surface to work on
Steps:
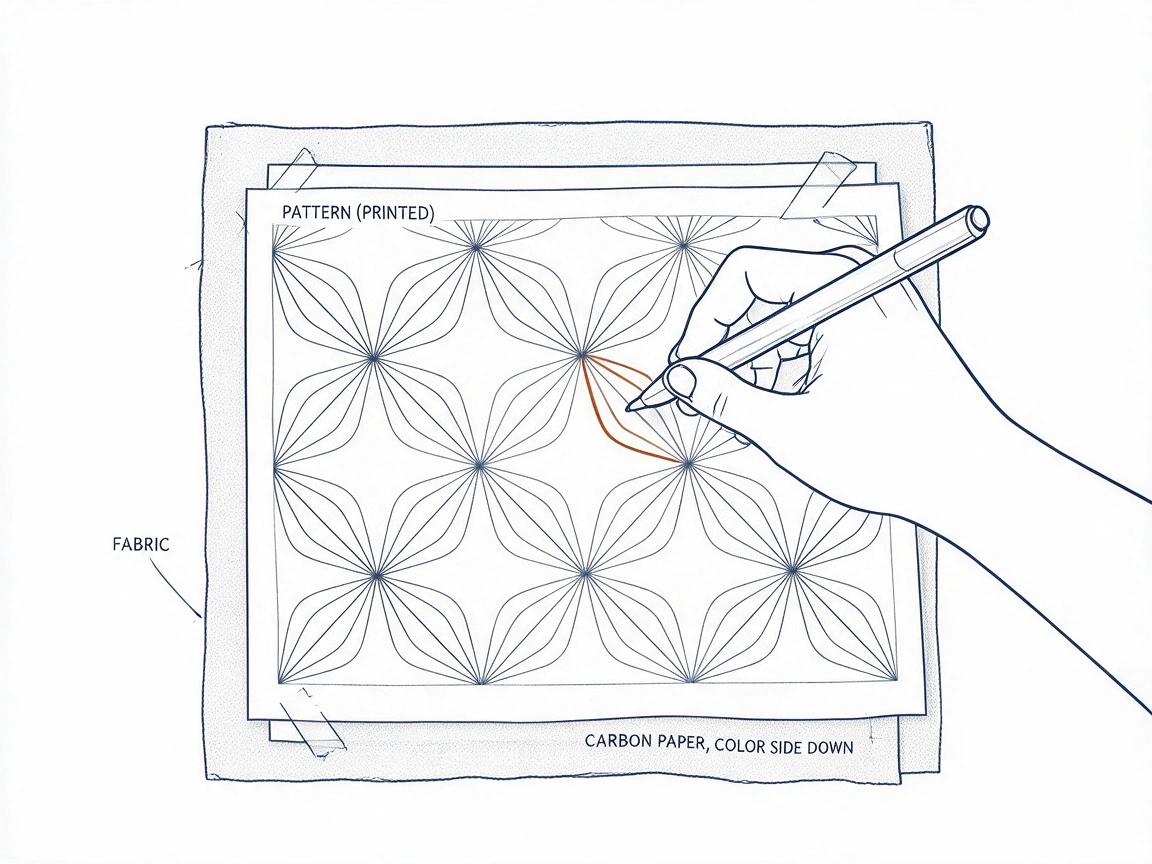
- Press the fabric smooth and lay it right-side-up on a firm, hard surface — not a soft or padded one, which cushions the pressure and gives you faint, patchy lines.
- Lay the carbon paper on top of the fabric, waxy/colored side facing down. Not sure which side is which? Rub a fingertip across it — the pigment comes off on the colored side, and that side faces the cloth.
- Place your printed pattern on top of the carbon paper.
- Secure all three layers with tape or pattern weights so nothing shifts during tracing.
- Trace every line firmly with the stylus, pressing hard enough to transfer the pigment but not so hard that you stretch the fabric — how much pressure depends on the brand of paper, so test on a scrap first. Work through the design in an orderly way (left to right, or from the center outward) so you don’t skip any lines, and keep your resting hand off the paper as you go — a palm left on it prints stray smudges. Lift a corner periodically to check the lines are transferring clearly.
- Remove the pattern and carbon paper. The transferred lines are generally not washable — they are meant to be covered by stitching. Plan your stitch placement so the thread hides them.
Pros: Works on virtually any fabric weight and color. No special equipment. Reliable on thick or tightly woven cloth.
Cons: Carbon marks are permanent or semi-permanent, so any exposed lines outside the stitched area will remain visible. Trace only the lines you intend to stitch, and keep the outer border of your design tight. Also, on very textured or napped fabrics (like wool flannel) the transfer can be uneven.
Method 3 — Printable water-soluble stabilizer (stick-and-stitch)
Best for: Dense geometric grids, beginners who want the most accurate transfer, and anyone who finds freehand tracing tedious.
Water-soluble stabilizer sheets (sold under brand names like Sulky Sticky Fabri-Solvy or similar) are a lightweight film you can run through an inkjet printer; check the label says inkjet-compatible before you buy. You print your sashiko pattern directly onto the sheet, peel and stick it to the fabric, stitch right through it, then rinse it away in warm water.
What you need:
- Printable water-soluble stabilizer sheets (inkjet-compatible; confirm before buying)
- An inkjet printer (laser printers can melt the film)
- Your sashiko pattern as a PDF or image file, sized to fit the sheet
- Warm water for rinsing
Steps:
- Load a stabilizer sheet into your inkjet printer. Print the sashiko pattern at 100% scale — do not scale to fit, as this will distort the grid dimensions.
- Allow the print to dry for a minute before handling — the ink sits on the surface and can smear if touched immediately.
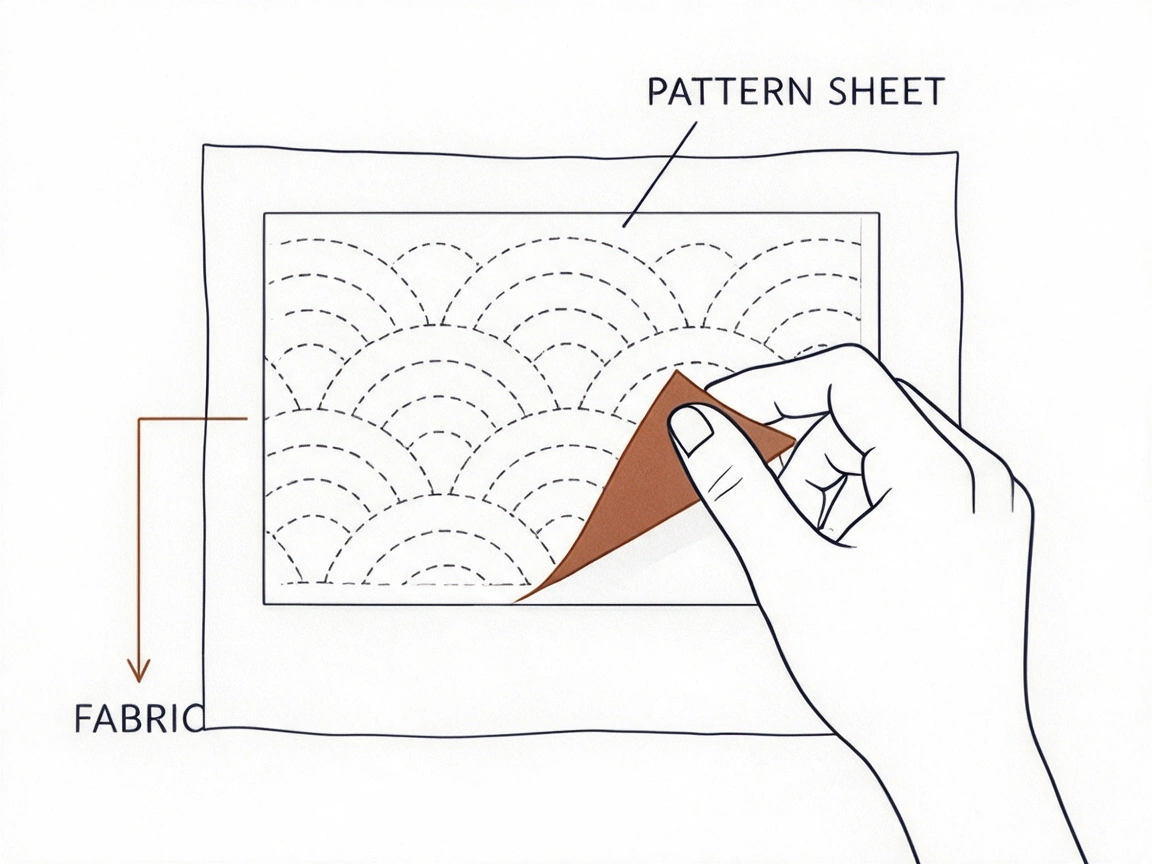
- Peel the backing from the sheet and press it onto your fabric, sticky side down. Smooth out any air bubbles from the center outward.
- Stitch directly through the stabilizer and fabric as you normally would. The film is thin enough that it does not significantly change the needle path, but use a sharp needle (not a ballpoint) to avoid dragging.
- When stitching is complete, soak the piece in warm water. The stabilizer dissolves within a few minutes — agitate gently and change the water once if needed. Cold water works but takes longer.
- Lay flat to dry.
Pros: Extremely accurate — no freehand tracing, so even complex interlocking grids come out precisely measured. Works on both light and dark fabrics. No separate marking tools required.
Cons: The stabilizer sheets have a material cost (typically $1–2 per A4/letter sheet). Some very open-weave fabrics can trap dissolved stabilizer residue in the holes; a second soak usually clears it. Not ideal for fabrics that cannot be wet (rare in sashiko, which traditionally uses cotton).
Method 4 — Hera (crease-fold, no ink)
Best for: Straight lines and grids on fabric where you’d rather not use any ink or pigment at all.
A hera is a smooth, blunt tool, traditionally bone or bamboo, though a plastic or smooth-edged bone folder works too. Instead of marking with a pen or pigment, you fold the fabric and run the hera along the fold to press a crisp, temporary crease into the cloth. It’s a marking-free method, so there’s nothing to wash out or worry about bleeding.
What you need:
- A hera, or a smooth bone folder / blunt-edged tool with no sharp point
- A ruler or straightedge for finding and folding accurate lines
- An iron, for stubborn creases on heavier fabric (optional)
Steps:
- Measure and fold your fabric along the line you want to mark, right sides together if the crease should be sharp, or wrong sides together if you’d rather crease it from the back.
- Run the hera firmly along the folded edge, using a ruler as a guide to keep the line straight. The pressure burnishes a crease into the fibers.
- Unfold the fabric. The crease reads as a fine, pressed line, visible enough to stitch along but with no ink or residue.
- Repeat for each line in the grid, working from the center out or in whatever order keeps your folds from overlapping awkwardly.
- Stitch along the crease. On finer or looser-weave fabric, the line can soften as you handle the cloth, so work through a section fairly soon after creasing it.
Pros: No ink, pigment, or wash-out step at all, so there’s zero risk of a mark that doesn’t fully come out. Works well on both light and dark fabric, since it doesn’t depend on visibility of pigment.
Cons: Only practical for straight lines, not curves or dense interlocking grids. The crease can soften over time or with handling, so it suits projects you’ll stitch soon after marking rather than ones you’ll set aside for weeks.
Which method to choose
| Situation | Recommended method |
|---|---|
| Light cotton, natural linen | Water-soluble pen + light source |
| Dark or indigo fabric | Dressmaker’s carbon or stick-and-stitch |
| Dense or highly geometric grid | Stick-and-stitch (most accurate) |
| No special supplies on hand | Water-soluble pen + a sunny window |
| First project, want minimal freehand work | Stick-and-stitch |
| Straight lines only, no ink at all | Hera (crease-fold) |
There’s no single right answer — experienced stitchers often keep several of these methods available and choose based on the project. A small hoop of seigaiha on natural cotton? Pen and a light pad. A full furoshiki in indigo with an asanoha grid? Stick-and-stitch is worth every penny.
Whichever method you use, always do a test on a scrap of the same fabric before committing to your main piece. Thread and fabric behave slightly differently once the lines are on them, and a two-minute test saves a lot of unpicking.
For the pens, carbon, and stabilizer named here — and which brands to trust — see sashiko materials & tools. Once your pattern is on the cloth, you’re ready to begin: how to stitch sashiko.